Create an Event
Before you create your first event, you’ll need to set up your Event categories. Event categories are used to enable features that affect the look and functionality of your event calendar including:
- Showing different types of events in different colors
- Allowing members to filter by category
- Allowing members to add events or access event administration
- Displaying a list of upcoming events by category or multiple categories using the event widget on a sidebar or widget area (available for WordPress)
- Allowing website visitors to subscribe to your event calendar
- Limiting visibility of events to members or particular groups of members
Learn how to add your calendar to your website so you can see what your members and website visitors will see.
Set Up Event Categories

- Go to MembershipWorks > Event Calendar.
- Click on Setup Event Categories at the top.
- Click + Add Event Category.
- Enter a “Category name”.
- Click on the color(s) you’d like to display for events in that category. You’ll see a check mark next to the colors you’ve selected.
- Enable the website navigation settings that fit your needs
- Click Save
You should only enable the “Visibility” setting if you’d like to limit who can view events in this category. Learn more about this feature in the section below — Advanced Event Options > Making Events Only Visible to Members.
Creating an Event
How Do I Create An Event?

Go to MembershipWorks > Event Calendar or MembershipWorks > Event List and click the Add New Event link at the top. This will take you to the new event’s Event Setup tab.
From here you can enter the event title, choose the color the event will be on your calendar, add in the start and end times, location and address.
To add a main image, click in the box that says “Click or drop file here to upload an image” and browse for the image on your computer. If using Chrome or Firefox, you can also drag a picture file from your desktop into the box to upload the picture.
You can adjust the background/text color of the title as it is overlaid on the picture through the option found under the Event title box.
You can enter in a description of the event and provide event details in the text box at the bottom.
What Format Should I Use For Images?
The image has to be GIF, JPG/JPEG or PNG format. We recommend your image to be a maximum of 800 pixels wide and 300-400 pixels high. Images that are too tall will require users to scroll down more just to get to your event information.
How Do I Collect RSVPs / Sell Tickets?
Once you’ve completed the event setup navigate to the Ticketing tab. You must create at least one ticket in order for users to be able to register or RSVP for the event.
Click + Add Event Ticket to create a ticket. Enter the name of the ticket, the price and quantity of tickets. If you leave the price blank, the ticket will be displayed with a dash “-” under the price. This would be desirable for RSVPs. If you make the price “0”, the price will be displayed as “Free”. If you leave the quantity blank, there will be no limits to the number of tickets sold.

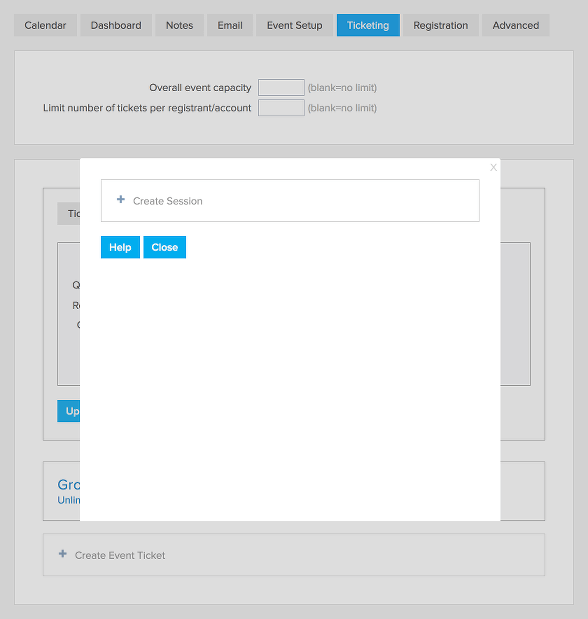
How Do I Manage Event / Ticket Capacity?
You can enter an overall capacity for the event in the first box under the Ticketing tab, or leave overall capacity blank to allow for unlimited RSVPs or ticket sales (individual ticket capacities can still be limited based on the ticket setup).
In the settings for each ticket, you can also set the number of tickets available, the number of tickets each user/member can register for, and how each ticket contributes towards the event capacity. For example, if your venue has a capacity of 100 people, and you offer a group ticket for a table of 5, you can set the ticket as counting 5 towards the event capacity, to ensure you do not oversell the event.
How Do I Create Member Only Tickets?
You may make tickets available to members only by checking the box next to Restrict to … users with these folders/labels when creating or editing a ticket. Visitors will be able to see the ticket (but not the price) and will be prompted to sign in if they wish to add the ticket. You may also make tickets available to members with specific labels or members in specific folders.
Note that for the purposes of registering for member only tickets, contacts under a members account inherit the member’s labels and folders in addition to any labels attached to the contact.
How Do I Create A Tax Free Ticket?
In the settings for each ticket, you can also set a specific tax rate for the ticket using the Override tax rate setting. If this is set, the ticket will be taxed at that rate, regardless of the event tax table, organization tax table, or whether the member was set as non-taxable. So if you set this rate to 0, the ticket would be tax-free.
Can I Collect Payments At The Door Or By Check?
You can enable offline billing under the event’s Advanced tab. Go to the section titled Advanced Registration Options and check the box next to Allow offline payment. Enter your payment instructions in the provided space.

Users that register and select offline billing will be indicated in the dashboard with their total in red so you can quickly identify whose payments are still due. The amount due will also be indicated in the CSV export from the Dashboard.
To record a payment from an event registrant, click the Manage link to the right of the registrant’s name and select Record Payment Received.
How Do I Collect Custom Information Like Meal Preferences?
If you are offering users the ability to register for multiple tickets at once and need to ask for information that is associated with each ticket, you can add the question under the Questions / Sessions / Add-Ons tab in the Ticket’s settings.

If you would like to add a question that only needs to be asked once, no matter how many tickets are being purchased, you should add this question under the event’s Registration tab. Click + Add Registration Question to create a custom question.
Copying an Event
Do you have a recurring event? You can easily copy existing events to create another instance of the event with the same tickets and settings. Existing registrations will not be pulled into the new event; the new event’s Dashboard will reflect new registrations on a go-forward basis.
To copy an event:
- Go to MembershipWorks > Event List
- Click on the name of the event you want to copy
- Go to the event’s Dashboard
- Click on the Copy Event button
- Select or type the date of the future event
- Click Copy

Note that any deleted tickets in the original event will not be carried forward to the new event.
Making Events Only Visible to Members

You can make certain events visible to just logged in members by creating an event category for this purpose. They can be visible to all members or just a particular group of members. To enable this feature follow the directions below to set the “Visibility” settings. Note that you can instead create tickets that are restricted to members only if you want your event to still be viewable on the calendar, but not allow non-members to register (see “Creating an Event” on this page and look for “How Do I Create Member Only Tickets?”).
- Go to MembershipWorks > Event Calendar
- Click on the event category you’d like to be visible to just members. If you have not created event categories yet see directions in “How to setup event categories” above
- Select “Visibility Only allow following members to view events in this category”
- Click on “Members (folder)”. You’ll see the background turns blue to show it is enabled. If you prefer you can select a different folder, label or membership level.
- Click Save
Allowing Members to Post or Access Events
Start by clicking Setup Event Category in Event List, then create or edit the Event Category that you want to provide member access to.
To allow a member belonging to a particular Folder or Label access to add or edit events, simply click on the appropriate Folder or Label box.

Once you select a Folder or Label, this will bring up the access settings:
- You may set member added events to be hidden until you approve them by changing the calendar color in the event setup. If you enable this option, the member will not have access to set or change the calendar color.
- You may want to allow members to add events to the calendar but not sell tickets on your site, since all payments would be processed through your billing system. So you can limit member access to the Event Setup tab only (ie. setting event title, picture, description, location and times). Members will not be able to access the Dashboard, Ticketing, Registration and Advanced settings.
- If you are working with volunteers, you may need to provide access to the event administration so they could send emails, export data, or check-in people at the event. But you may not want to provide access to anything to do with billing (ie. adding, editing, or refund registrations), so you can disable access to registrations only.
- If you do not want members to be able to edit or access events created by a different member, you can also limit access accordingly.
Note that contacts under a member account inherit the access available to the parent account, in addition to any labels specific to that contact.
Multiple Permissions
You may setup access for multiple Folders/Labels for each event category. You can also set different permissions for the different Folders/Labels. For example, you may allow a committee member full access, while a volunteer cannot access registrations.
If the member matches more than one Folder or Label, the member will given the maximum access as permitted across the different Folders/Labels. ie. if you set one Label/Folder not to allow access to registrations, but the other Label/Folder that the member also belongs to does allow it, then that member will be allowed access to registrations.
Notification Of Member Added Events
You can setup one or more email addresses to be notified of when a member adds an event to the calendar. For multiple email addresses, separate the emails with a comma.
How Members Can Post Events
Once you create an Event Category where members can add events, an Add New Event link will appear on your website page where you have added your event calendar or event list that contains that Event Category. This link will only be visible to members who have logged in and are allowed to post events.

You can also opt to create a separate Add Event page where logged in members can add events. This comes in handy if you would like to provide instructions above your event submission form or want an easy link to send to members. To add an event submission form to your site, use our instructions for adding a shortcode or HTML5 snippet to your website and pick the feature named Member add event.
Approving Member Added Events
If you selected “Set member added events as hidden until approved” when you set up your Event Category, you’ll need to approve events created by members. The emails listed in the field Notify following email(s) when a member adds an event will be emailed when a member submits an event for approval.
To approve a member-added event:
- Log into the back end of MembershipWorks.
- Go to MembershipWorks > Event List.
- Click on the hidden event.
- Click theEvent Setup link at the top.
- Next to Display on calendar/list, click on one of the calendar color boxes to select a color for the event.
- Click Save & Continue at the bottom of the page.
Collecting Donations with Event Registration
The Ticket Questions / Sessions / Add-Ons feature will make it easy for your members to make a donation when they register for an event. You can offer several donation amount options and include their selection in the event registration confirmation email.
Where to Setup Event Add-Ons
- Go to MembershipWorks > Event List and click on the event.
- Click the Ticketing link at the top.
- Click on an existing ticket or click on + Add Event Ticket.
- Click the Questions / Sessions / Add-Ons link at the top.


- Under Additional questions to include for each of this ticket added to cart, click on Add Question / Session / Add-on Per Tcket

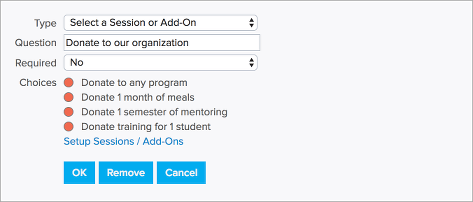
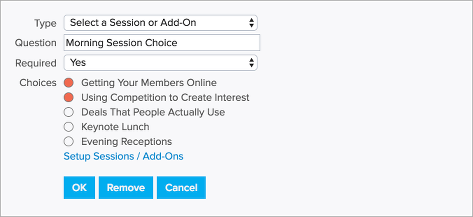
- Next to Type, select Select a Session or Add-On from the dropdown

How to Setup Your Donations
- After step 5 above, click “Setup Session / Add-Ons”
- Click “Create Session”
- Give your donation option a name
- Set a price to the donation amount
- Classify the payment as a donation
- If you need to override the default tax rate you can set the percentage under “Override tax rate”. For example of you are charging a tax for the tickets but donations are tax free you can set “Override tax rate” to “0”.
- Click Save
- Repeat for each donation option you’d like to offer

Once all of your donation options are created you can add a “Select a Session or Add-On” question and offer these options with the ticket. For example you can create the question “Donate to our organization” and then offer the different donation amounts you’ve set up. If the donation is optional, you should set “Required” as “No” for that question, that way registrants who do not wish to donate can skip the question.
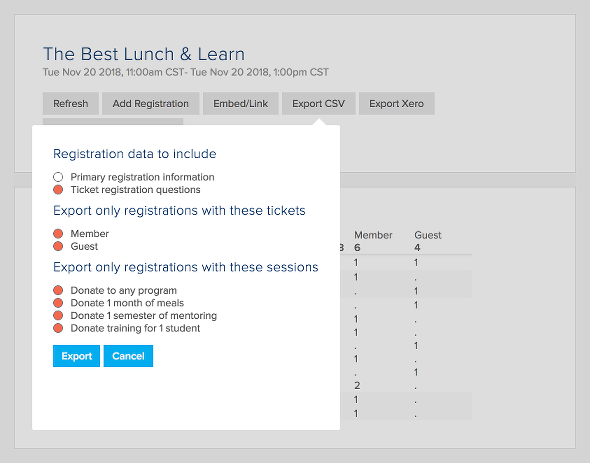
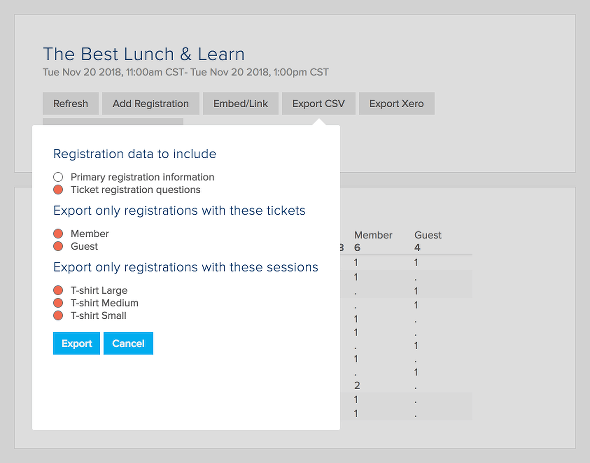
How to Create a List of Donors from the Event
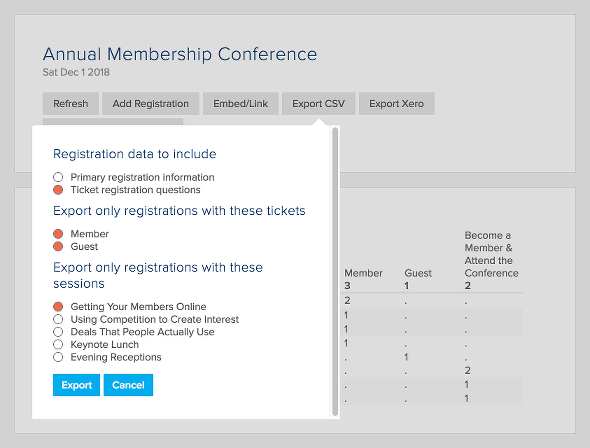
- Go to the Dashboard tab of the event
- Click Export to CSV
- Uncheck “Primary registration information”
- Select the donations under “Export only registrations with these sessions”
- Click Export
Event Confirmation Email
Collecting a donation when attendees register for an event does not trigger a separate donation receipt. If there is special information you need to include in the receipt you should add it to the Event Confirmation Email in the Advanced tab.
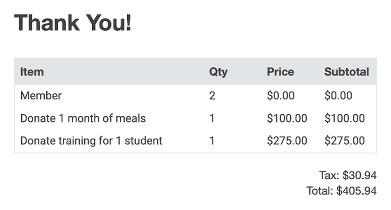
The [itemtable] tag can be used in the Event Confirmation Email to provide a break down of the event registration charges by ticket and donation. In the example below 2 member tickets were purchased along with 1 donation for a month of meals and 1 donation for training for 1 student.
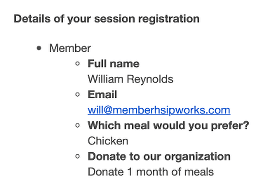
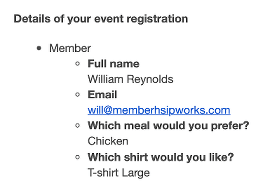
To have the confirmation email include all the information associated with each ticket you can use the tag [tqn].
Selling Cart Items with Event Registrations
The Ticket Questions / Sessions / Add-Ons feature will make it easy for your members to purchase items (eg. t-shirts) when registering for an event. You can offer several options and include their selection in the event registration confirmation email.
Where to Setup Event Add-Ons
- Go to the Ticketing tab of the event
- Click on “+ Create Event Ticket” to create a ticket
- Select the Questions / Sessions / Add-On tab
- Click “Add question, session or add-on per ticket”
- Set the Type to “Select a Session or Add-On”
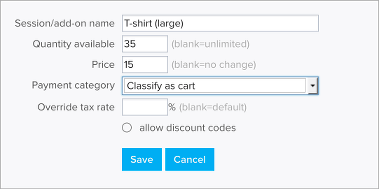
How to Setup Your Items
- From step 5 above, click “Setup Session / Add-Ons”
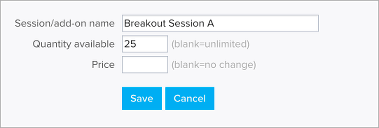
- Click “+ Create Session”
- Give your item a name
- Set the “Quantity Available” if there is a limit to the number of this item you can sell
- Set the price for the item
- Set the “Payment category” to “Classify as cart”
- If you need to override the default tax rate you can set the percentage under “Override tax rate”. For example of you are charging a tax for the tickets but the item is tax free you can set “Override tax rate” to “0”.
- If you’d like to allow discount codes you can enable that feature and then select the discount codes that you will accept for this item. You will see that enabled discount codes will get a blue background after you click on them.
- Click Save
- Repeat for each item you’d like to offer.
Once all of your items are created you can add a “Select a Session or Add-On” question and offer the items as options for the question. For example you can create the question “Which shirt would you like?” and then offer the different options you’ve set up. If the items are optional, you should set “Required” as “No” for that question, that way registrants who do not wish to purchase an item can skip the question.

How to Create a List of Cart Purchases from the Event
- Go to the Dashboard tab of the event
- Click Export CSV
- Uncheck “Primary registration information”
- Select just the items you need for under “Export only registrations with these sessions”
- Click Export
Event Confirmation Email
Selling a cart item when attendees register for an event does not trigger a separate cart receipt. If there is special information you need to include in the receipt you should add it to the event confirmation email.
The [itemtable] tag can be used in the Event Confirmation Email in the Advanced tab to provide a break down of the event registration charges by ticket and item. In the example below 2 member tickets were purchased along with 1 medium and 1 large t-shirt.
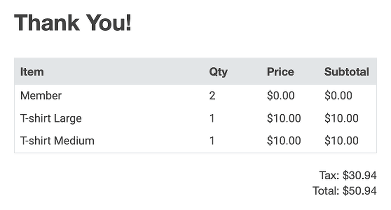
To have the confirmation email include all the information associated with each ticket you can use the tag [tqn].
FAQs
- Items are set up separately on each event.
- The discount code is applied to each item included in the registration. For example if you set up a $10 discount code for a t-shirt and someone registers for 3 tickets and chooses a t-shirt for each ticket, the discount code will apply too all 3 t-shirts for a total discount of $30.
Utilizing Event Sessions for a Conference
The Ticket Questions / Sessions / Add-Ons feature makes it easy for you to manage breakout sessions at your conference. It can be used to accomplish the following:
- Allow event registrants to register for conference breakout sessions
- Charge for sessions
- Create registrant lists for each session
Where to Setup Event Sessions
- Go to the event’s Ticketing tab
- Click on “+ Create Event Ticket” to create a ticket
- Select the Questions / Sessions / Add-On tab
- Click “Add question, session or add-on per ticket”
- Set the Type to “Select a Session or Add-On”
How to Setup Your Sessions
- From step 5 above, click “Setup Sessions / Add-Ons”
- Click “Create Session”
- Give your session a name
- Set the “Quantity Available” if there is a limit to the number of attendees for this session
- Set a price if there is an additional charge for attending this session
- Choose how to classify the payment (event, donation, membership, or cart)
- If you need to override the default tax rate you can set the percentage under “Override tax rate”. For example of you are charging a tax for the tickets but the session is tax free you can set “Override tax rate” to “0”.
- If you’d like to allow discount codes you can enable that feature and then select the discount codes that you will accept for this session. You will see that enabled discount codes will get a blue background after you click on them.
- Click Save
- Repeat to create each session
Once sessions are created you will be able to choose which ones are available for each “Select a Session or Add-On” question. For example if you are having morning and afternoon breakout sessions you would first create all of the options for both the morning and breakout sessions. Then you would create 2 session questions, one for the morning and the other for the afternoon. You can select which options to make available for each “Select a Session or Add-On” question.
How to Create a List of Session Registrants
- Go to the Dashboard tab of the event
- Click Export CSV
- Uncheck “Primary registration information”
- Check just the session you are creating a registrant list for
- Click Export
You can repeat the above directions for each session to create a registrant list for each of your breakout sessions.
Event Confirmation Email
The [itemtable] tag can be used in the Event Confirmation Email in the Advanced tab to provide a break down of the event registration charges by ticket and sessions. Note that only sessions that have a charge associated with them will appear in the table. In the example below 2 member tickets were purchased along with 2 keynote lunch sessions and 1 event reception session.
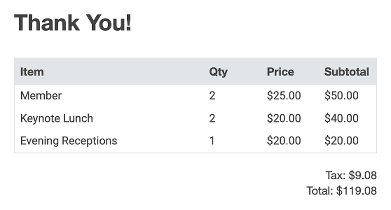
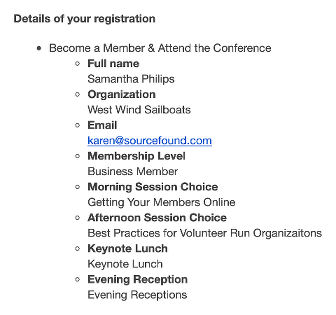
To have the email include all the information associated with each ticket, you can add the tag [tqn].
FAQs
- Sessions are set up separately on each event.
- The discount code is applied to each session included in the registration. For example if you set up a $10 discount code for Session A and someone registers for 3 tickets and chooses Session A for each ticket (ie. total of 3 Session A) the discount code will apply to all 3 Session A for a total discount of $30.
Using Registration Actions

Folders and Labels are great ways to organize your members. You can easily pull up members with a particular folder or label to send a group email or export their information. These Registration Actions under the Advanced tab let you automatically assign labels or folders to members when they register for an event.
Note that if you check the circle next to “If user does not have account, add user to these labels/folders (at least 1 folder required),” registrants will be added to your MembershipWorks account and counted toward the number of accounts in the system for billing purposes.
If you have our Premuim MailChimp Integration option, you’ll see the option to “add registrants to email list” which can be used to avoid the scenario above where users are added as accounts in MembershipWorks. You can use the “atttach tag” feature within this option to instead add a tag of your choosing to registrants in MailChimp.
Allowing Members and Visitors to Subscribe to Your Events Feed
Members and website visitors can now subscribe to your event feed. In addition, your members and website visitors can subscribe to just a single event category or your entire calendar. Event categories that are set to to members only will not be available for subscription.
You are in control which event categories website visitors can subscribe to. To enable the event feed for an event category (note that feeds cannot be enabled for member only event categories):
- Go to MembershipWorks > Event Calendar
- Click on “Setup Event Categories”
- Click on a category to edit it (or “Add Category” if you have not yet created any)
- Enable “Allow users to subscribe from feed”
- Click “Save”

How Members and Website Visitors Subscribe
It’s easy for your members and website visitors to subscribe to the events feed from your website. They will see a “Subscribe” button at the top of your calendar or event list. They can choose to add the feed to their default calendar, Google calendar or copy the feed/URL to their event calendar.

Set Up a Multi-Day Event That Occurs on Consecutive Days
If you have a multi-day event that occurs on consecutive days, you can add the first day of the event as the start date and the last day as the end date under the Event Setup tab. You can see an example of this below:

Below is an example of how this event will display on the event calendar:

Notice that although the event spans across the consecutive days on the calendar, it is still just one event. A user will go to the same event page no matter which day they click.
Set Up a Multi-Day Event That Occurs on Non-Consecutive Days
If you have a multi-day event that occurs on non-consecutive days (e.g., a class or workshop that takes place every Monday night for 3 Mondays in a row) the best option is to add a separate event for each day of the class/workshop. After adding the first event, you can easily copy it to the other dates on the calendar
To add the first event:
- Go to MembershipWorks > Event List and click the Add New Event button at the top.
- Next to Event category, click to select the applicable category from the dropdown
- Enter an event title
- Next to Start, enter the date of the first event/class/workshop. You can also enter a start Time, although this is optional.
- Next to End, enter the date of the first event/class/workshop (the same day entered as the start date) and enter the end Time (optional).
- Complete the other fields under the Event Setup tab as needed (e.g., Place/location, Event address, description, etc).
- Click Save & Continue at the bottom. This will move you to the Ticketing tab, which you should not complete yet. Instead, follow the instructions below to first copy the event to the other non-consecutive days when the classes/workshops occur.
To copy the event:
- Go to MembershipWorks > Event Calendar
- Click and drag the event title to the next date the event will occur
- Repeat this process until you have a separate event on each day the event/class/workshop occurs.
Here is how this will look on the calendar:

If the event shown above (3 non-consecutive days) had been added as one event with a start date of Oct 2nd and an end date of Oct 16th instead of three separate events, the event would have spanned through all of the days between Oct 2nd and Oct 16th.
If you do not need users to register or RSVP for the event, you do not need to complete any more steps. However, if you want users to be able to register or RSVP for the series of events, continue with the instructions below.
Enable registrations for a multi-day event that occurs on non-consecutive days
Although each day of the multi-day event is technically a separate event on the calendar, most organizations find the best option is to keep all of the registrations in the same location which makes it easier to view, manage or export your attendee list.
To set this up, you should add tickets to the last day’s event in the series. Before adding tickets, you should consider which of these two options work best for your registration. You can find the instructions for each option below.
- Registration option 1 – Selling the event as a whole
Registrants pay one price for the entire series and will be able to attend each day of the event. - Registration option 2 – Selling separate event tickets for each day of the event
Registrants only pay for the days of the event they will be attending
Registration option 1 – Selling the event as a whole
Below is an example of what this ticket selection will look like on the registration page.

- Go to MembershipWorks > Event Calendar and click on the last event in the series
- Click the Ticketing tab at the top
- Click + Add Event Ticket
- Enter a Ticket name. (e.g., Member Ticket, Guest Ticket, etc)
- Next to Ticket price enter the price to register for the entire event series
- Complete the other fields under the Ticket tab as necessary. If you are not limiting this ticket to one per registrant/account, you should follow these steps to collect each attendee’s information:
- Click the Questions / Sessions / Add-Ons tab
- Click + Add Question / Session / Add-on Per Ticket
- Next to Type, select Name or Full name from the dropdown
- Click OK
- Repeat steps 6b to 6d for each field as needed
- Click Save
Registration option 2 – Selling event tickets per day of the event
Below is an example of what this ticket selection will look like on the registration page.

- Go to MembershipWorks > Event Calendar and click on the last event in the series
- Click the Ticketing tab at the top
- Click + Add Event Ticket
- Enter a Ticket name that is indicative of the day of the event. (e.g., Monday, Oct 2)
- Next to Ticket price enter the price to register for that particular day’s event
- Complete the other fields under the Ticket tab as necessary. If you are not limiting this ticket to one per registrant/account, you should follow these steps to collect each attendee’s information:
- Click the Questions / Sessions / Add-Ons tab
- Click + Add Question / Session / Add-on Per Ticket
- Next to Type, select Name or Full name from the dropdown
- Click OK
- Repeat steps 6b to 6d for each field as needed
- Click Save
- Repeat steps 3-7 for each event day
Edit the confirmation email
One thing to note is that the confirmation email automatically adds a calendar attachment file (.ics file) which includes the date and time of the event. However, this will only add the date/time for the last event to their calendar since that is the event you are adding the tickets under. For this reason, you may want to edit the confirmation email to include all of the dates and times for the class.
To edit the email:
- Go to MembershipWorks > Event Calendar and click on the last event in the series
- Click the Advanced tab at the top
- Go to the box titled Confirmation Email
- Edit the message as needed, including details such as date and time for each day of the event
- Click Save
Final Step: Redirect all events to the last event date for registration
In order to keep all of the registrations in the same location, you should redirect all the events to the URL of the last event in the series.
Copy the URL
- Go to MembershipWorks > Event Calendar and click on the last event in the series
- Click the blue Embed/Link button under the event’s Dashboard tab
- Right click on the link under Direct link to event page and select Copy Link or Copy Link Address from the pop-up menu
If the link under Direct link to event page begins with event-url-not-setup, you should not copy that link. Instead, you can follow these steps to copy the URL:
- Go to the calendar on your website and click on the last event date in the series
- Select and copy the URL from the browser’s location bar (shown below)

Redirect the events
- Go to MembershipWorks > Event Calendar and click on the first event in the series
- Click Advanced tab at the top
- Under Redirect to external event page, paste the URL of the last event into the field
- Click Save
- Go to MembershipWorks > Event Calendar and click on the next event in the series and repeat steps 2-4. Repeat this for each event in the series (except for the last event date)