Announcement Board
Create an Announcement/Notice Board
- Log into MembershipWorks and go to Jobs/Other Boards
- Click on “+ New Jobs/Classifieds/Other Boards”
- Type a name for your Board (no spaces or special characters); note that this name is just for admin reference. Although the name does not appear on your site, it will be part of the page URL.
- Choose the “Announcements Board” type from the “Default settings” drop down menu.

Settings
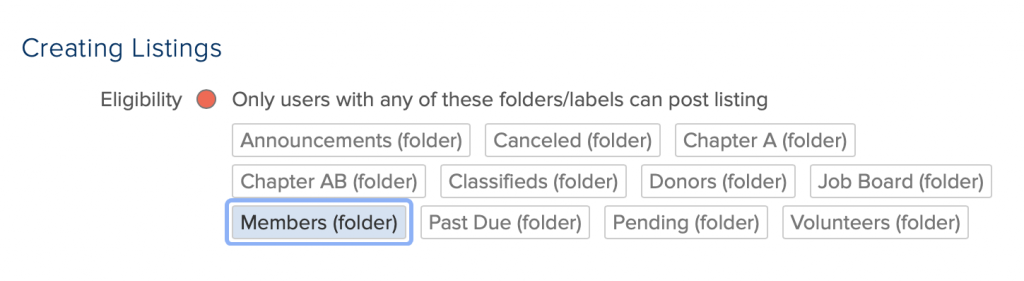
- Using the “Eligibility” settings, you can allow members with specific labels, folders, add ons or membership levels to add listings. This is helpful if you sell the ability to add listings as an add on or as a benefit only available to certain membership levels. If you uncheck this box, any website visitors, including nonmembers, may add listings.

- You can require admin approval for announcements by checking the circle within “Approval __ require admin approval to display”. If you choose this option, be sure to enter at least one email in the “Notify email(s) when a new listing is posted.” This is the email address that will receive a notification to approve a new posting.
- Set a fee for listings under “Posting fee” if you want to charge listers a per-posting fee to post on your Board.
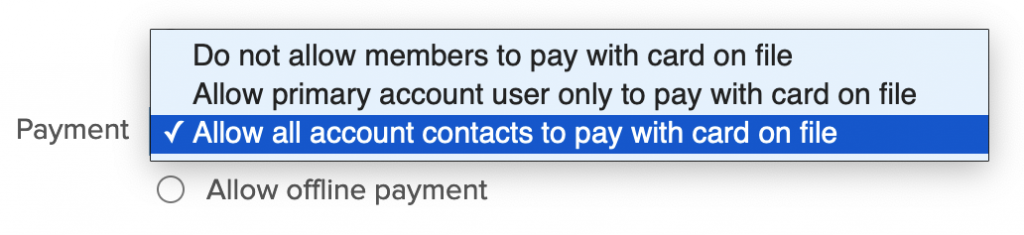
- Under “Payment”, you have an option to allow members to charge their card on file if:
- They are on auto recurring billing for their membership, and
- You use Stripe or Authorize.net (with CIM) as your payment gateway

- If you are allowing nonmembers to post listings, you will need to:
- Review and pick an existing folder or create a new folder in MembershipWorks > Folders to organize these non-members. You can call it “Listings,” “Announcements” or something similar so you can later identify the reason they’ve been added to your accounts. Note that when nonmember accounts are added to the system, these accounts count toward the number of accounts in your system for billing purposes with MembershipWorks.
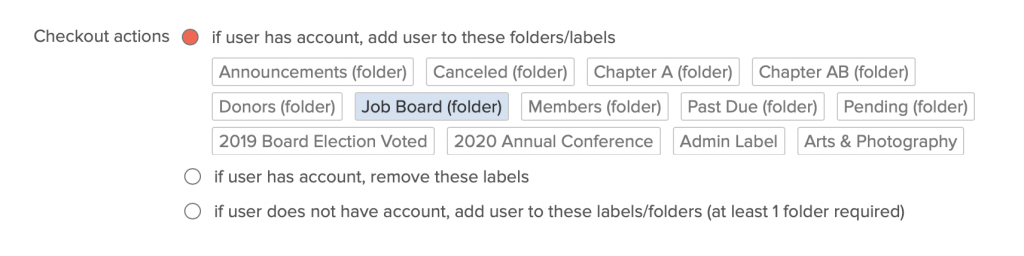
- Check the following setting in “Checkout actions”: “if user does not have account, add user to these labels/folders (at least 1 folder required)” and
- Then select a folder for these nonmembers to be placed within. Selected folders and labels will be in blue.

This will allow non-members who add listings to log back in to track, edit, suspend or renew their listings.
- If you want to group and track the members who are posting listings (beyond the tracking on the board’s Dashboard), you can check the following setting in “Checkout actions”: “if user has account, add user to these folders/labels”. You’ll then want to select which folder and/or label you want to apply to the member. Selected folders and labels will be in blue. You can optionally create a new folder in Folders or create a new label in Labels & Membership for this purpose.

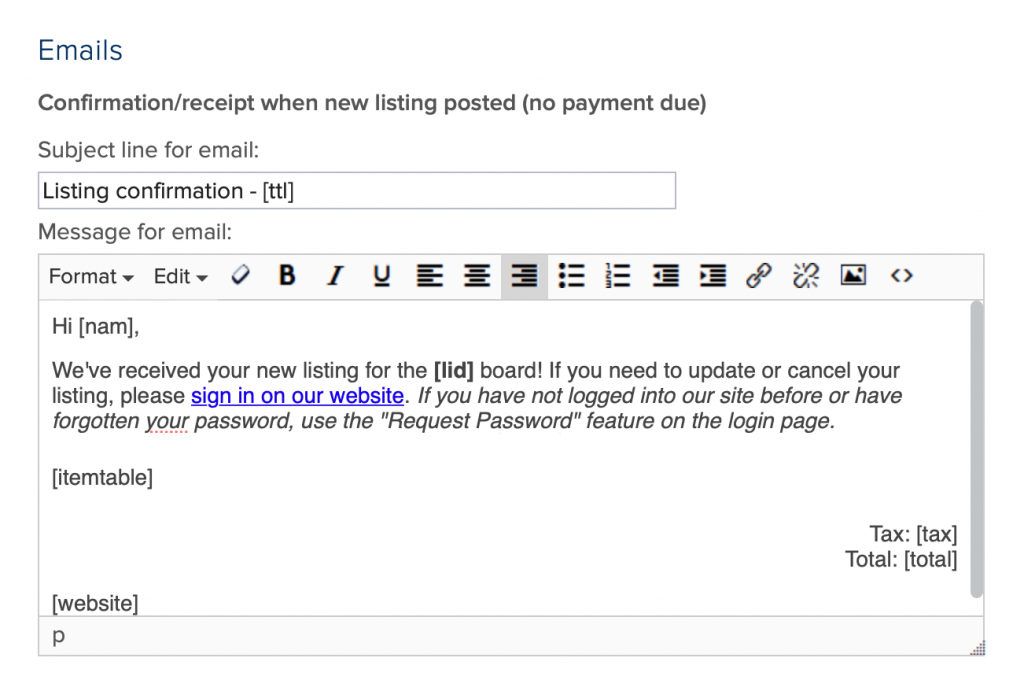
- Under “Emails”, it is a good idea to add links in the emails to the listings page and to the listing management page on your website so that those who want to edit or update their listing can easily find where to do that. You can also mention that non-members will need to use the “Request Password” feature on the login page if they have not logged in before.

Form Template Tab
The fields in this section will be pre-populated with questions according to which type of Board you selected when you created the form. You are welcome to edit or remove these fields or add new ones.
Important: Review and adjust the fields and tags to fit your organization and members. The default settings are generic and may not be optimal for your needs. Once you’ve made changes be sure to click “Save Template” to finalize the changes.
Display Template
For Announcement Boards, if you want to set up Search/Filter criteria, you’ll need to create a new custom field with the type “Select”. Here’s how:
- Go to the Form Template tab
- Scroll to the section where you want to add the question.
- Click on “+ Add Field”
- In the Description field, type a question such as “What type of announcement is this?”
- In the Field dropdown, choose “New custom field”
- In the Type dropdown, choose “Select”
- Add Choices you want the lister to choose from when submitting a listing
- Click “OK”
- Click “Save Template”
- Now return to the Display Template page where you can click on “+ Add Search/Filter Field” to specify the new field you just created.
Adding an Announcement Board to Your Website
You can add the announcement board to your website by utilizing a shortcode (WordPress) or HTML5 snippet (Weebly, SquareSpace, etc.) that we provide. Please note that you can only put 1 shortcode or snippet on a page. You’ll need to add three pages onto your site to make your job board fully functional:
- Announcement Listings Page
- Announcement Posting Page
- Manage Listings Page
Add an Announcement Board to a WordPress Website
You’ll need to add three pages onto your site to make your Announcement Board fully functional.
Add an Announcement Board Listings Page
- First, create a new page in WordPress where your announcement listings will exist on your website
- Go to the Dashboard tab of your Announcements board
- Click Embed
- Make sure WordPress is selected
- Copy the “View listings shortcode” in the yellow box
- Paste it onto your website page that you are creating
- Click “Publish” or “Update” in WordPress to save your changes

Add an Announcement Listing Submission Page
Tip: Add a link to this page from your Listings page. Having a link to this page there will help promote the creation of listings.
- Create a new page in WordPress where your Announcements submission form will exist on your website. This will be the page where people will add their announcements listings.
- Go to the Dashboard tab of your Classifieds board
- Click Embed
- Make sure WordPress is selected
- Copy the “Post listing shortcode” in the yellow box
- Paste it onto your website page that you are creating for your listing submission form
- Click “Publish” or “Update” in WordPress to save your changes
Add a Manage Listings Page
Note: if you have multiple boards (jobs, classifieds, announcements, etc.), you only need one listings management page. Members and users will be able to manage their listings across all the boards on this one page.
- Create a new page in WordPress where your manage listing page will exist on your website. This will be the page where employers can log in to manage their job postings
- Go to the Dashboard tab of your Announcements board
- Click Embed
- Make sure WordPress is selected
- Copy the “Manage listings shortcode” in the yellow box
- Paste it onto your website page that you are creating for classified ad posters to manage listings
- Click “Publish” or “Update” in WordPress to save your changes
Tip: Add a link to this page from your Listings page. This will help prior listing posters manage their listings. Also add a link to this page within the “Message for email” in Emails under your form’s Settings tab. This will help listing submitters easily find where they need to login to manage their listings.
Add an Announcement Board to all Other Websites
You’ll need to add three pages onto your site to make your Announcement board fully functional.
Add a Listings Page
- First, create a new page in your website builder (Weebly, Squarespace, Wix, etc.) where your announcement listings will exist
- Go to the Dashboard tab of the Announcements board
- Click Embed
- Select either “Wix” or “All Other sites” according to what type of website you have
- Copy the “View listings snippet” in the yellow box
- Paste it onto your website page that you are creating
- Publish your page or save your changes if the page is already published

Add an Announcement Board Listing Submission Page
Tip: Add a link to this page from your Listings page. Having a link to this page there will help promote the creation of listings.
- Create a new page in your website builder where your Announcement listings submission form will exist on your website. This will be the page where submitters create their announcement listings.
- Go to the Dashboard tab of the Announcements board
- Click Embed
- Select either “Wix” or “All Other sites” according to what type of website you have
- Copy the “Post listing snippet” in the yellow box
- Paste it onto your website page that you are creating for your listing submission form
- Publish your page or save your changes if the page is already published
Add a Manage Listings Page
Note: If you have multiple boards (jobs, classifieds, announcements, etc.), you only need one listings management page. Members and users will be able to manage their listings across all the boards on this one page.
- Create a new page in your website builder where your manage listing page will exist on your website. This will be the page where classified ad submitters will manage their listings
- Go to the Dashboard tab of the Announcements board
- Click Embed
- Select either “Wix” or “All Other sites” according to what type of website you have
- Copy the “Manage listings snippet” in the yellow box
- Paste it onto your website page that you are creating for submitters to manage their classified listings
- Publish your page or save your changes if the page is already published
Tip: Add a link to this page from your Listings page. This will help prior listing posters manage their listings. Also add a link to this page within the “Message for email” in Emails under your form’s Settings tab. This will help listing submitters easily find where they need to login to manage their listings.
Managing Your Announcement Board Listings
Approve Listings
If you checked the circle in Settings > “Approval __ require admin approval to display” and entered at least one email in the Settings > “Notify email(s) when a new listing is posted,” that email address will be notified when it is time to approve a new listing. To approve the listing:
- Log into MembershipWorks
- Go to Jobs/Other Boards
- Click on the name of the Board
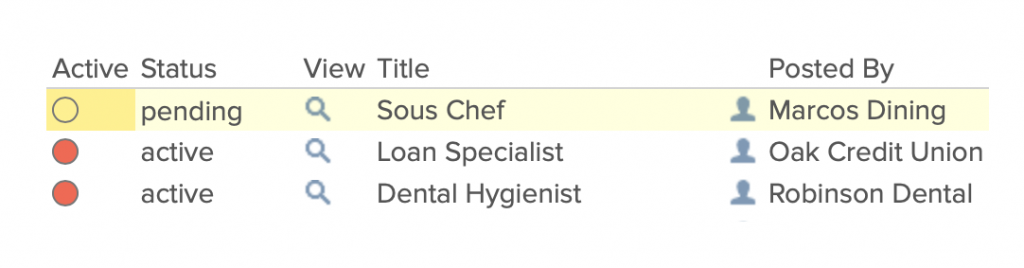
- On the Board’s Dashboard, you will see a listing with a Status that is “pending”
- Click on the circle next to the listing to make it “active”
- The email you have set up in Settings > Emails > Confirmation when listing activated (approved and/or fee due paid) will be sent to the listing poster so that they know it is approved.
Manage Listings
See our tips for handling:
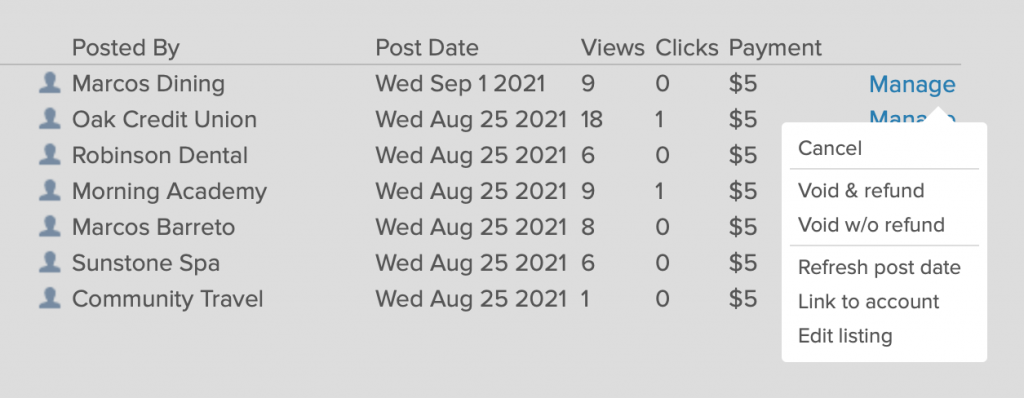
- Edit or void a listing – Members and others are able to login and edit or cancel their listings, but administrators can also handle these tasks from the Board’s Dashboard. Simply find the listing and click on “Manage.” To hide the listing from the front end, you can select one of the Void options. You can use the Edit listing feature to make changes to text or images.
- Refreshing a listing – When a listing is refreshed the posting date will be reset and the listing will be returned to the top of all listings. An administrator can refresh a listing at any time. Members cannot refresh listings by default but you can enable members to refresh listings themselves under the board settings.
- Check payments – If you are charging for listings and want to accept offline payments, we recommend using these Settings at minimum:
- Set a “Posting fee”
- Under Payment, check the circle next to “Allow offline payment” and enter instructions and an address to send payment to
- Check the circle in “Approval __ require admin approval to display”
- Enter at least one email address in the field “Notify email(s) when a new listing is posted”
To process the payment and turn on the listing, go to your Board’s Dashboard and find the pending listing. Click on the Manage link and select “Record payment received.” Then change the status from “pending” to “active.”
- Secondary administrators – Organizations can allow secondary administrators to manage Board postings. The primary administrator should:
- Go to Organization Settings > Admins
- Click on the name of the secondary administrator who needs access to Boards
- In the drop down menu next to “Boards”, select “Full boards admin”
- Click “Save”